I first came across Hong Kong-based Shoe Artistry’s classes earlier last year, but the timings didn’t work out (I even made reached out when I was in Hong Kong earlier this year) – super glad that they had a series of workshops in Singapore recently.
By then I had managed to find two other occasions to make some footwear (a pair of leather espadrilles and leather sandals), so I decided to sign up for the ballet flats workshop so that I can experience some new techniques. My friend joined me and she made a pair of leather lace up espadrilles – the workshop was held at Maketh Project’s premises in Singapore.

I had to select leather colours – was deciding between black and brown for the toe cap, and settled for the black textured leather in the end
I indicated my shoe size while signing up, and my shoe pattern was prepared for me – just had to trace and cut the pieces out. We were using very soft leather (so that we can shape the shoe by hand on the shoe last), and one benefit for me was that I could use scissors to cut the leather (it feels a lot less tiring than using a penknife for the harder leather)!
After which there was a series of gluing and sewing the pieces together – the instructor helps to do the sewing on the sewing machine, but we get to choose the colour of the thread

Had to cut some pieces (like interfacing) to give shape to the front and back of the shoe
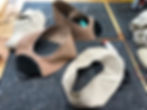
Most of the time later was then spent shaping the lining, and then the upper over the shoe last. We had to use an iron to attach the interfacing pieces in between the lining and upper (took some skills to maneuver a large iron over an irregularly-shaped shoe!). The “wrapping” bits at the ends of the shoes reminding me of dumpling making…
After which, I was cutting foam and leather pieces to make an insole, and then putting glue on the soles and shoe
Kit (our instructor) helped to attach the soles (I suppose because it’s super important to be accurate since the glue is super sticky – in fact, we had to wait for some time for the glue to dry before sticking them together, hence the hair dryer):
After which, it’s pretty much done! Kit had to expend some energy to get the shoes out of the shoe last (which was quite challenging given we had managed to somehow wrap the shoes around rather tightly).

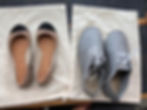
Ta-dah! My own pair of leather ballet flats!

Our beautiful shoes doing some modelling
Somehow when you make something, it feels like it’s the most beautiful thing in the world (is this what having your own child feels like haha)

Thanks to Kit and her as
sistant (I think her name was Veron?) – I termed this an F4 selfie and I guess I look like Daomingsi haha

Very happy parents to our own shoe babies 😀
Price: 225 SGD for the ballet flats, 180 SGD for the tie string espadrilles (we had an early bird 10% discount). I did a bank transfer and saved on some paypal transaction fees! There are many other different footwear options at different levels and prices for their Singapore workshops here.
Or if you’re interested in their Hong Kong classes, they have them more regularly there, I believe
Duration: 6 hours (but we’ve all had some leatherwork experience before, so finished it in a bit less, ~5-5.5 hours?)
Level of “fun”: 4/5
It was the first time I properly got to look into the a simple pair of ballet flats are put together. It’s not exactly the same way they are really made , but getting to look at the insides and putting each layer over each other over a shoe last (I’ve never worked with a shoe last before) was quite fun!
This was a different type of experience as I did not do the same type of things I did in the previous leather footwear workshops that involved hand sewing (likely due to the harder leather used then – my friend who made the lace up espadrilles used harder leather and hand-sewed her shoes together).
Level of difficulty: 3/5
The workshop was generally quite easy – the small group size (there were just 4 of us) made it easy for the instructors to help us along. The sewing (on the machine) was done by the instructor (which I imagine could be tricky for those who haven’t used one before).
The other parts that were slightly trickier were ironing the hard interfacing onto the lining, and also wrapping the leather over the shoe last nicely (thankfully the instructors were on hand to help make some adjustments where needed)